The Linux df command is an incredibly useful tool. What this command does is report file system disk usage. So when you want to see how much file system disk space is available, you can fire up your terminal and use df to learn everything you need to know about disk usage.
But you don’t want to just know the very basics of the command. Like anyone who hopes to master the Linux operating system, you want to know the commands in all their glory. With that in mind, let’s take an in-depth look at the df command and see what we can get out of it.
Basic usage
To understand the non-basic usage of the df command you must first understand the basic usage. So, the basic usage of df is:
df [OPTION] FILE
Where [OPTION] is any one (or combination) of the available options and FILE is a file located on a specific disk or partition. Don’t get confused about this. If you specify a file you will not see how much disk space the particular file uses. What you will see is the disk usage of the disk or partition the file resides on. This is a bit confusing at first.
The possible options are:
- a – Include dummy file systems.
- -B – Use SIZE in blocks.
- –total – Produce a grand total.
- -h – Print sizes in human readable formats.
- -H – Print sizes in human readable formats, but use powers of 1000 and not 1024.
- -i – List inode information and not block usage.
- -l – Limit listing to local file systems.
- –no-sync – Do not invoke sync before getting usage information.
- -P – Use POSIX output format.
- –sync – Invoke sync before getting usage information.
- -t – Limit listing to file systems of TYPE.
- -T – Print file system type.
- -x – Exclude file system type.
Now, let’s piece some of these options together to make df really useful.
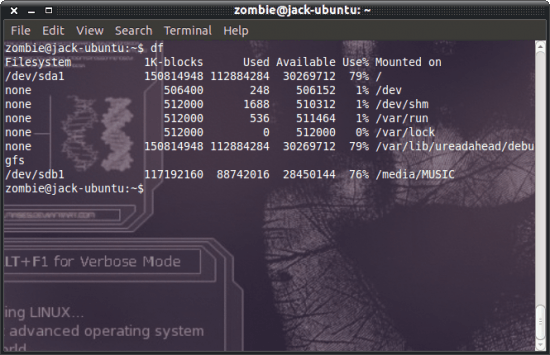
Obviously, the basic usage is df. When you use that command you will see something like you see in Figure 1. If you’re looking for a much easier to read output, you would issue the command df -h. That will display everything in human readable format (see Figure 2).
Now, let’s add the partition types to the listing. To do this you would issue the command df -hT. This output would be similar to that in Figure 2, only it would add a column for Type before the Size column.
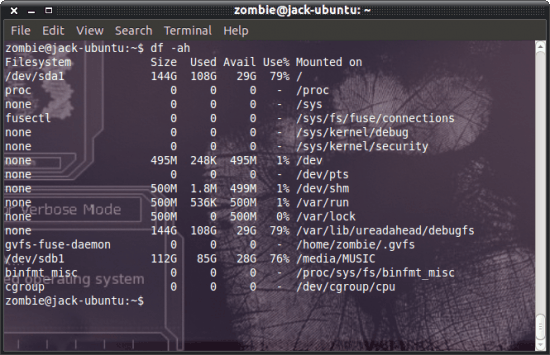
If you have a need to know the size of dummy file systems (such as dev, usb, proc, etc) on your machine, you could run the command like df -ah. This will add rows to your listing that will look like that shown in Figure 3.
What if you want to see a grand total of the percentage of disk space being used across all of your drives? To do this, issue the command df –total and you will see a new line added to the output that looks similar to what you see in Figure 4.
Final thoughts
A little df fun to help you gather all the knowledge you need with regards to how much space has been taken up on your disks. There are plenty of other tools to help you get this (and more) information from the command line. We’ll deal with more of those later.


